Here is a quick writeup of the protocol for the iKettle taken from my Google+ post earlier this month. This protocol allows you to write your own software to control your iKettle or get notifications from it, so you can integrate it into your desktop or existing home automation system.
The iKettle is advertised as the first wifi kettle, available in UK since February 2014. I bought mine on pre-order back in October 2013. When you first turn on the kettle it acts as a wifi hotspot and they supply an app for Android and iPhone that reconfigures the kettle to then connect to your local wifi hotspot instead. The app then communicates with the kettle on your local network enabling you to turn it on, set some temperature options, and get notification when it has boiled.
Once connected to your local network the device responds to ping requests and listens on two tcp ports, 23 and 2000. The wifi connectivity is enabled by a third party serial to wifi interface board and it responds similar to a HLK-WIFI-M03. Port 23 is used to configure the wifi board itself (to tell it what network to connect to and so on). Port 2000 is passed through to the processor in the iKettle to handle the main interface to the kettle.
Port 2000, main kettle interface
The iKettle wifi interface listens on tcp port 2000; all devices that connect to port 2000 share the same interface and therefore receive the same messages. The specification for the wifi serial board state that the device can only handle a few connections to this port at a time. The iKettle app also uses this port to do the initial discovery of the kettle on your network.Discovery
Sending the string "HELLOKETTLE\n" to port 2000 will return with "HELLOAPP\n". You can use this to check you are talking to a kettle (and if the kettle has moved addresses due to dhcp you could scan the entire local network looking for devices that respond in this way. You might receive other HELLOAPP commands at later points as other apps on the network connect to the kettle.Initial Status
Once connected you need to figure out if the kettle is currently doing anything as you will have missed any previous status messages. To do this you send the string "get sys status\n". The kettle will respond with the string "sys status key=\n" or "sys status key=X\n" where X is a single character. bitfields in character X tell you what buttons are currently active:| Bit 6 | Bit 5 | Bit 4 | Bit 3 | Bit 2 | Bit 1 |
| 100C | 95C | 80C | 65C | Warm | On |
So, for example if you receive "sys status key=!" then buttons "100C" and "On" are currently active (and the kettle is therefore turned on and heating up to 100C).
Status messages
As the state of the kettle changes, either by someone pushing the physical button on the unit, using an app, or sending the command directly you will get async status messages. Note that although the status messages start with "0x" they are not really hex. Here are all the messages you could see:
| sys status 0x100 | 100C selected |
| sys status 0x95 | 95C selected |
| sys status 0x80 | 80C selected |
| sys status 0x100 | 65C selected |
| sys status 0x11 | Warm selected |
| sys status 0x10 | Warm has ended |
| sys status 0x5 | Turned on |
| sys status 0x0 | Turned off |
| sys status 0x8005 | Warm length is 5 minutes |
| sys status 0x8010 | Warm length is 10 minutes |
| sys status 0x8020 | Warm length is 20 minutes |
| sys status 0x3 | Reached temperature |
| sys status 0x2 | Problem (boiled dry?) |
| sys status 0x1 | Kettle was removed (whilst on) |
You can receive multiple status messages given one action, for example if you turn the kettle on you should get a "sys status 0x5" and a "sys status 0x100" showing the "on" and "100C" buttons are selected. When the kettle boils and turns off you'd get a "sys status 0x3" to notify you it boiled, followed by a "sys status 0x0" to indicate all the buttons are now off.
Sending an action
To send an action to the kettle you send one or more action messages corresponding to the physical keys on the unit. After sending an action you'll get status messages to confirm them.
| set sys output 0x80 | Select 100C button |
| set sys output 0x2 | Select 95C button |
| set sys output 0x4000 | Select 80C button |
| set sys output 0x200 | Select 65C button |
| set sys output 0x8 | Select Warm button |
| set sys output 0x8005 | Warm option is 5 mins |
| set sys output 0x8010 | Warm option is 10 mins |
| set sys output 0x8020 | Warm option is 20 mins |
| set sys output 0x4 | Select On button |
| set sys output 0x0 | Turn off |
Port 23, wifi interface
The user manual for this document is available online, so no need to repeat the document here. The iKettle uses the device with the default password of "000000" and disables the web interface.If you're interested in looking at the web interface you can enable it by connecting to port 23 using telnet or nc, entering the password, then issuing the commands "AT+WEBS=1\n" then "AT+PMTF\n" then "AT+Z\n" and then you can open up a webserver on port 80 of the kettle and change or review the settings. I would not recommend you mess around with this interface, you could easily break the iKettle in a way that you can't easily fix. The interface gives you the option of uploading new firmware, but if you do this you could get into a state where the kettle processor can't correctly configure the interface and you're left with a broken kettle. Also the firmware is just for the wifi serial interface, not for the kettle control (the port 2000 stuff above), so there probably isn't much point.
Missing functions
The kettle processor knows the temperature but it doesn't expose that in any status message. I did try brute forcing the port 2000 interface using combinations of words in the dictionary, but I found no hidden features (and the folks behind the kettle confirmed there is no temperature read out). This is a shame since you could combine the temperature reading with time and figure out how full the kettle is whilst it is heating up. Hopefully they'll address this in a future revision.Security Implications
The iKettle is designed to be contacted only through the local network - you don't want to be port forwarding to it through your firewall for example because the wifi serial interface is easily crashed by too many connections or bad packets. If you have access to a local network on which there is an iKettle you can certainly cause mischief by boiling the kettle, resetting it to factory settings, and probably even bricking it forever. However the cleverly designed segmentation between the kettle control and wifi interface means it's pretty unlikely you can do something more serious like overiding safety (i.e. keeping the kettle element on until something physically breaks).
ZoneMinder is an amazing Linux video camera security and surveillance application I use as part of my home automation system. ZoneMinder prior to version 1.23.3 contains unescaped PHP exec() calls which can allow an authorised remote user the ability to run arbitrary code as the Apache httpd user (CVE-2008-1381)
CVSS v2 Base Score 6.5 (AV:N/AC:L/Au:S/C:P/I:P/A:P)
This is really a moderate severity flaw because you need a remote attacker who has the ability to start/stop/control ZoneMinder, and you really should protect your ZoneMinder installation so you don't allow arbitrary people to control your security system. (Although I think at least one distributor package of ZoneMinder doesn't protect it by default, and you can find a few unprotected ZoneMinder consoles using a web search).
I discovered this because when we went on holiday early in April I forgot to turn down the heating in the house. Our heating system is controlled by computer and you can change the settings locally by talking to a Jabber heating bot (Figure 1). But remotely over the internet it's pretty locked down and the only thing we can access is the installation of ZoneMinder. So without remote shell access, and with an hour to spare at Heathrow waiting for the connecting flight to Phoenix, I figured the easiest way to correct the temperature was to find a security flaw in ZoneMinder and exploit it. The fallback plan was to explain to our house-minder how to change it locally, but that didn't seem as much fun.
So I downloaded ZoneMinder and took a look at the source. ZoneMinder is a mixture of C and PHP, and a few years ago I found a buffer overflow in one of the C CGI scripts, but as I use Red Hat Enterprise Linux exploiting any new buffer overflow with my ZoneMinder compiled as PIE definately wouldn't be feasible with just an hours work. My PHP and Apache were up to date too. So I focussed on the PHP scripts.
A quick grep of the PHP scripts packaged with ZoneMinder found a few cases where the arguments passed to PHP exec() were not escaped. One of them was really straightforward to exploit, and with a carefully crafted URL (and if you have authorization to a ZoneMinder installation) you can run arbitrary shell code as the Apache httpd user. So with the help of an inserted semicolon and one reverse shell I had the ability to remotely turn down the heating, and was happy.
I notified the ZoneMinder author and the various vendors shortly after and updates were released today (a patch is also available)
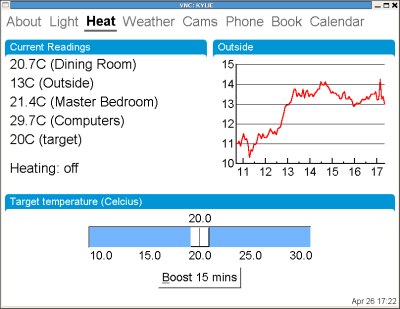
Figure 1: Local heating control
My home automation tablets use Perl/Tk as their user interface which makes coding and prototyping really quick and easy and works on both Linux and Windows platforms.
 I use ZoneMinder for looking after the security cameras around the house and had
set up the tablets to be able to display a static image from any camera
on demand. But what I really wanted to do was to let the tablets display
a streaming image from the cameras.
I use ZoneMinder for looking after the security cameras around the house and had
set up the tablets to be able to display a static image from any camera
on demand. But what I really wanted to do was to let the tablets display
a streaming image from the cameras.
ZoneMinder is able to stream to browsers by making use of the Netscape server push functionality. In response to a HTTP request, ZoneMinder will send out a multipart replace header, then the current captured frame as a jpeg image, followed by a boundary string, followed by the next frame, and so on until you close the connection. It's perhaps not as efficient as streaming via mpeg or some other streaming format, but it's simple and lets you stream images to browsers without requiring plugins.
So I wrote the quick Perl/Tk program below to test streaming from ZoneMinder. It does make some horrible assumptions about the format of the response, so if you want to use this with anything other than ZoneMinder you'll need to edit it a bit. It also assumes that your network is quite good between the client and ZoneMinder; the GUI will become unresponsive if the network read blocks.
My first attempt ran out of memory after an hour -- I traced the memory leak to Tk::Photo and it seems that you have to use the undocumented 'delete' method on a Tk::Photo object otherwise you get a large memory leak. The final version below seems to work okay though.
# Test program to decode the multipart-replace stream that
# ZoneMinder sends.  It's a hack for this stream only though
# and could be easily improved.  For example we ignore the
# Content-Length.
#
# Mark J Cox, mark@awe.com, February 2006

use Tk;
use Tk::X11Font;
use Tk::JPEG;
use LWP::UserAgent;
use MIME::Base64;
use IO::Socket;

my $host = "10.0.0.180";
my $url = "/cgi-bin/zms?mode=jpeg&monitor=1&scale=50&maxfps=2";

my $stop = 0;
my $mw = MainWindow->new(title=>"test");
my $photo = $mw->Label()->pack();
$mw->Button(-text=>"Start",-command => sub { getdata(); })->pack();
$mw->Button(-text=>"Stop",-command => sub { $stop=1; })->pack();
MainLoop;

sub getdata {
    return unless ($stop == 0);
    my $sock = IO::Socket::INET->new(PeerAddr=>$host,Proto=>'tcp',PeerPort=>80,)
;
    return unless defined $sock;
    $sock->autoflush(1);
    print $sock "GET $url HTTP/1.0\r\nHost: $host\r\n\r\n";
    my $status = <$sock>;
    die unless ($status =~ m|HTTP/\S+\s+200|);

    my ($grab,$jpeg,$data,$image,$thisbuf,$lastimage);
    while (my $nread = sysread($sock, $thisbuf, 4096)) {
        $grab .= $thisbuf;
        if ( $grab =~ s/(.*?)\n--ZoneMinderFrame\r\n//s ) {

            $jpeg .= $1;
            $jpeg =~ s/--ZoneMinderFrame\r\n//; # Heh, what a
            $jpeg =~ s/Content-Length: \d+\r\n//; # Nasty little
            $jpeg =~ s/Content-Type: \S+\r\n\r\n//; # Hack

            $data = encode_base64($jpeg);
            undef $jpeg;
            eval {
                $image = $mw->Photo(-format=>"jpeg",-data=>$data);
            };
            undef $data;
            eval {
                $photo->configure(-image=>$image);
            };
            $lastimage->delete if ($lastimage); #essential as Photo leaks!
            $lastimage = $image;
        }
        $jpeg .= $1 if ($grab =~ s/(.*)(?=\n)//s);
        last if $stop;
        $mw->update;
    }
    $stop = 0;
}
My paper on "Security Response and Vendor Accountability for Open Source Software" was accepted for Linux World 2003 in San Francisco and I'm giving a similar talk at Linux for Business in London on the 10th June. The role of the open source vendor is often neglected when folks talk about the security of open source software.
House modifications are coming along well, with updates to the Home Automation security software (a few suprises for any intruder), and some large black marble balls on a rockery out the front. Tracy has been spending a few days pressure-washing the driveway which is fun apart from the occasional lump of sand that gets blasted at random parts of your body. Sand in your nose is quite annoying.
Several hours later and I manage to find out the extended commands for the LW11G dimmer unit. Can't find these anywhere else mentioned on the web, so for future generations:
# Extended X10 control of LW11G dimmer
#
# Unlike other L*11* modules the LW11G
# seems to only respond to code 53.  Set the data to
#
# 0 = immediate off
# 255 = immediate on
# 1-254 = slowly dim or bright to that level, turns on if
not already